Nursery Makeover Part 1 - Chandelier
 |
| Home Decorator's Collection Chandelier - Home Depot |
When I found out we would be having a little girl, I immediately began filling my Pinterest with ideas for the nursery. One thing I knew for sure that I HAD to have in Baby Girl's room was a chandelier. However, when I started researching them, I knew there was no way I could justify spending so much money on a light fixture that I didn't really need. I resigned myself to the fact that I would never have a chandelier like those I had found at Lowe's, Home Depot, and Hobby Lobby.
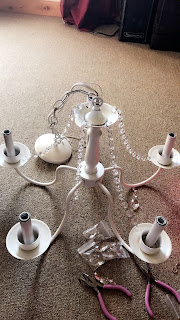
I moved on to other projects for the nursery, but could not get the idea of a chandelier out of my head - I couldn't have the perfect nursery without one! And so, I began to research. I searched thrift stores, yard sale sites, and local stores for inexpensive, plain chandeliers. I finally found one for $16 at our local Habitat for Humanity. Though it wasn't anything special, I knew with a little bit of work, I could transform it.

Once these coats dried, the pearl spray paint went on sooooo much better. As a side note, when spray painting, I highly suggest painting outside, and wearing a mask - especially when pregnant.

It took several days for the spray paint to fully cure on this chandelier (maybe because it was a humid Indiana day when I painted it?) While it was drying, I took the time to search craft stores like Michaels, Hobby Lobby, and Joann's for crystals to bedazzle the chandelier. However, none of these stores had what I was looking for - I finally turned to Amazon and found exactly what I needed!
I spent a few dollars more than I had to buying the crystal strands and teardrop crystals because I chose to buy those that were Prime eligible. I was willing to spend a few more dollars to have them arrive within two days, and have the ability to return them if they weren't what I wanted. The teardrop crystals were $13.99 for a pack of 24, and the crystal strand was $9.99 for 16 feet. I knew I wouldn't need all of this, but figured I could save the extra for future projects.
Just to keep you up to date on what I have spent so far on this project:
$16 - Chandelier
$6.76 - Spray Paint
$13.99 - Teardrop Crystals
$9.99 - Crystal Strand
Total: $46.74
Once the glue dried, I had to enlist the help of my husband to cut the extra chain links out of the chandelier so that it would hang properly in the nursery. Thankfully, my husband is a man of many talents and knows how to hang light fixtures. While I was at work one day, he took down the fan that was in the room, and replaced it with the chandelier. I was so excited to see our finished project when I got home!
The final touch to our chandelier were the frosted bulbs we decided to go with. We found some for about $6 at Lowe's.

Though it did take several weeks to complete this chandelier, I didn't have to put too much time into actually working on it, I just spent a few minutes on it here and there, when I had free time. After subtracting the amount spent on items that are being saved for later projects, our total cost for this chandelier came to about $39, including the light bulbs.
I am so pleased with how it turned out, and cannot wait to complete our sweet girl's nursery. Only a few more projects left!


Comments
Post a Comment